Zero Point Perspective is simple enough to describe and talk about. It is when there is essentially no vanishing point to follow. This technique applies for when you are drawing a mountain range on the horizon line of a drawing, or a set of buildings.
Now you see, what prevents this part of the image from being flat is the shading. It still remains a 3D image, even if it does not follow any set path of vanishing points. Also note that these sorts of images don't have to be on the tip of the horizon line, they can also be slightly below the plot of the horizon.
Still the image does not have to apply to just mountains, but any object that lay near the horizon line and follows no real vanishing point.
And that is essentially all there is to say about Zero Point Perspective. It's a simple enough technique to grasp, but it is very easy to mess up. Be sure you know your shading techniques should you want to draw out these types of images with depth behind them.
Now onto Four Point Perspective.
So four point perspective is a technique that captures that distortion into a flat image. It's not particularly useful to use, but it's useful to know and helps for understanding perspective.
Earlier I had talked about Three Point and how you would have essentially three points. Two points would be to the side of the picture, while a third one would either point to the heavens, or down to Earth, creating a sense of an object being far below you, or going high above you.
Now in the case of four point perspective, the guideline is simple. If you are already drawing in three point you simply need to add a fourth vanishing point either to the bottom or the top of the drawing.
You simply start from the area where the horizon would be, and draw as if you were drawing your third vanishing point.
You should get something similar to this:
I find the best usage for this technique is when you want to make a drawing that makes the viewers eyes follow the distortion, like say you were drawing a tower that is supposed to be very up close to you. The bottom of the tower would be far below the horizon line and be where your feet are. Then you would make the tower rise high up to the sky, creating a long vanishing point that simulates the feeling of looking up to the sky.
And that is about everything I have to say on the subject of the perspectives. It was a long and arduous study, and I know fully well that I need to learn more for the future. Well, I can only hope that these blog posts helped any artists looking for simple advice.
I made this piece in about a week to get out material for my portfolio. While it represents a great leap in design and color, it also takes a few steps back in design.
I made this piece up as a little representational piece for a story I hitched up in my mind. A Zelda one actually, but because of my timelimit, I wan't able to really fill in the finer Zelda details, such as the triforce, and the proper dress for Princess Zelda. So I supose at this time, it only relates to Zelda in description.
I drew this out with the idea of wanting to capture size and strength with this behemoth of a dragon. I kept his body hidden, mostly because I didn't want to draw it, but instead went with the idea of him only showing his head to display his massive girth across the screen. However, I feel as if he is too flat, and not the behemoth he should be, though I'm not sure why. Whether it is the fault of the horizon or how I drew his face, I am unsure. I can only say that I want to redo it again.
The shading was something I've been practicing. Capturing a sort of paint like feel without the use of all the outlines I am used to using, along with multiple paint effects and layers using simple brush strokes to capture what I want.
Again, not one of my best pieces, but certainly a step up.
In this continuation of my study of the perspectives, I shall move on to, Two Point Perspective.
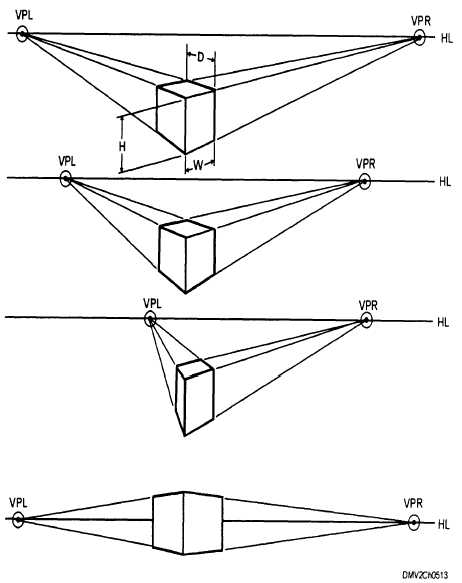
Two point perspective is little different from One Point in that it now has two vanishing points instead of one. To explain, let's take a look at these images.
Note, which side of the box is facing us (the viewer)?
Obviously, both. We are looking at the corner of the box, and we get a view of two different sides as they point in the direction of seperate vanishing points. And thus, you have two point perspective. All of the same rules as one point still exist, and I implore you to explore as many different options as you can with this type.
Next comes, Three Point Perspective
Simply put: It is a type of perspective similar to two, only that it deals in extreme highs, and extreme lows
When drawing in Three Point you begin by drawing it out as if it were two. You find two vanishing points on the horizon and begin to plot out the corner corners of the object you are looking to draw.
However, you begin to move to three point perspective when drawing out the corners of the box in your grid. This time around the corners won't be completely parallel as they were beforehand and will begin to actually head to what we call the third vanishing point.
You first find the third vanishing point by making a line from the middle corner, either up or down. From there you would have the other two corners converge onto that one line to create the effect of a great distance being either high up or down.
Remember, where you place the box matters as it will determine from what point of view you would be looking through. If you were to place it above the horizon line, you would essentially be using a worm's eye view, and if it were below the line, you'd be looking through a bird's eye view.
Of course, that doesn't mean you can't go for variation every now and then.
Take one of my latest drawings for example:
I mapped this one out on a particular angle and started with a grid that began at the bottom of the horizon line, but as the character begins to rise above the line, we as the viewer begin to see their perspective begin to change as well. We see the character's body on the upper right angle in a way that we see their features from the bottom, where as if you look at the bottom left the character's body is angled in a way that we see only their bottom.
And that's about how well I can talk about Two and Three Point Perspective. Join me later for when I finish this and explore Four and Zero Point Perspective.
I'm back, and with a new topic of study for the day. I am going to go over One and Two Point Perspective in Art.
Before I talk about Perspective though, let me drop an important definition regarding this tool.
Horizon:
We drop the word in conversations a lot, so it shouldn't be too hard to grasp it. A horizon is basically the invisible line which represents your eye level, and how you are viewing a scene. It also represents how you shall see certain objects. Take the ocean below.
In a literal sense, the horizon is that point in the middle where the ocean and sky just seem to disappear from our sight, similar to a wall. But the difference between this photo and a wall is the depth given by the horizon line.
Case in point, you know that the ocean seems to be coming closer to us as you reach the bottom of the picture? So imagine you were floating over the ocean and you happen to be seeing this same exact scene; where would the ocean eventually go? Under you, and the sky would be above.
You see, objects that are below the horizon line are always objects which you will see the top of as they come closer in and objects that are above the horizon line will be objects you can always see the bottom of.
And the way this depth works changes drastically depending on where you intend the horizon to be.
If you were to look down, you would begin to see more of the top parts of the objects that are below you.
And the same applies for up.
Now keep in mind, these images are just a basic and rough idea of what would happen. I encourage you to simply go outside and take a look for yourself. Stand somewhere high up and look off into the distance to where you can see a horizon line and begin to look up and down. You'll notice some amazing things when you pay attention.
And now we have one last definition to explain: Vanishing Point
A vanishing point is essentially the one point in a perspective where everything will seem to be converging onto one area way off into the distance.
Take this road for example.
It doesn't take a genius to notice that the white lines at the side of the road look as if they are going to meet up in the middle of the road, the further and further you look, and the road also seems to be shrinking towards the middle of your field of vision.
This is a vanishing point. All objects on this road quickly converge as they move farther and farther away, until they vanish on this one point.
However, a vanishing point doesn't have to be in the distance to be one. It can also be up close.
What matters is that everything is heading in the direction of the Vanishing point, therefore, it is one.
So now you hopefully understand the nature of the horizon line and vanishing points a bit better, now we can move on to talking about the perspectives that you are capable of with a horizon line and vanishing points.
------------
I've learned of about 7 types of perspectives so far, but for now, I believe I'll only talk about five of them for sanity's sake. One Point- Perspective Two Point Perspective Three Point Perspective Four Point Perspective Zero Point Perspective One point Perspective is easily the most common of the bunch. It is essentially when there shall be one vanishing point in the entire picture that everything shall converge on. Those pictures I had shown of the wall and the road were both essentially that.
But don't be so one minded; after all, there are plenty of other ways to capture a one point perspective, as long as your vanishing point remains on the horizon, it can be anywhere in the picture. (And since the horizon doesn't have to be in a set position...)
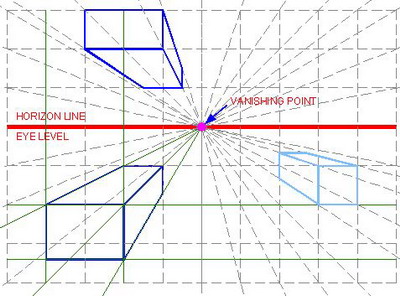
And here is essentially how you would grid something in a one point perspective.
Just remember, everything must converge onto the one vanishing point.
So, I've been doing my anatomy studies, and am trying to wrap my head around the ideas presented to me, and I'm not going to lie, many of these concepts are not... reaching me that well. However, in spite of my confusion, I'm going to do my best to explain what I've compiled.
Note: Most of my research is exploring material that is useful to my studies as an animator at the moment. If I feel as if the study does not benefit me, I will not list it.
Today I'm going to talk about Joints.
There are immovable joints, slightly movable joints, and fully movable joints.
The most I got out of immovable joints were the sutures on the human skull.
Apparently they are held together by fibrous material, allowing for the pieces of the skull to be held together. Why they are not just one bone, I'm not sure. But they connect separate skull bones to make the shape of the skull stay together.
There was nothing interesting for me to say about slightly movable joints at this time.
The most important joints overall though, would have to be the fully movable joints, or as most of them are commonly called; synovial joints.
These are the joints that are designed to move and be moved around by your command. Though these bones have their occasional limits.
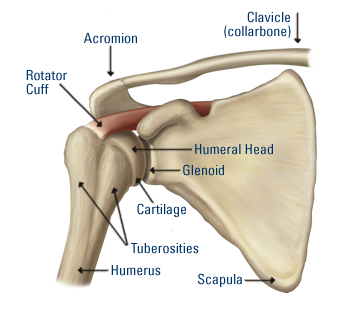
The first one I shall be talking about is the ball and socket joint.
These joints are commonly seen as the joints for your shoulder and thigh.
This joint allows for complete movement and rotation in just about any direction. The only thing they can't do in comparison to other bones, is glide.
They are only ever limited by the ligaments and muscles of your body. In certain cases, it's possible to stretch the joints past the limits. In my case, I've done this before with my arms. I would raise them to the back of my body and pull them back all the way while they are clamped together. I meet some resistance, but the process is not too painful.
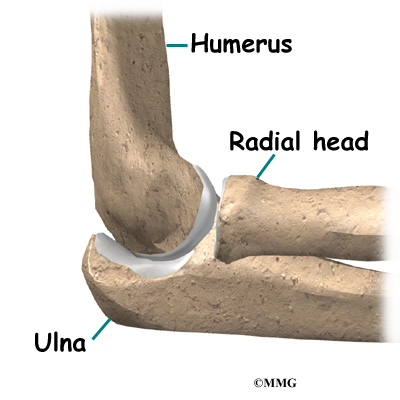
The next one is the Hinge Joint.
The hinge joint behaves similarly to how the name suggests. It's a joint that only allows the bone to bend and extend, though it is also limited by bone structure, muscles, and ligaments.
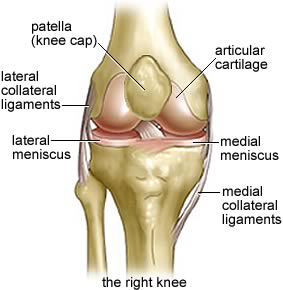
The two main users of this bone are the arm and knee.
These bones are very important for keeping our physical structure in place. For instance, if our knee was a ball and socket joint with the same amount of freedom, we would probably be unable to run or walk properly most of the time unless the ligaments were intensely strong. Though our arms may benefit from it, if the ligaments and muscles were structured enough.
Considering these joints are right next to the most freedom allowing joints, they provide a lot of limitations themselves. They define what is an effective movement or not. For starters, if one were to go in for a punch, one would not just toy around with their ball joint for flashiness. They would go for a straight punch and get it over with.
Here's a little tidbit: Note the little bulge in front of the knee. That is called the patella, it's meant to protect your joint from being harmed or dislodged, though the patella itself is not fully attached to the knee, it does a fairly good job.
The next joint is a pivot joint.
It does just as the image claimed. It turns from side to side and little to no else. There are only three of these types of joints in the human body, one in the neck and one in both elbows.
Their sole purpose is to rotate from side to side. It allows us to turn our necks to the right and left. It allows us to spin our forearms like a drill and gives our wrist a longer twist.
Still, this is limited; One cannot turn their head all the way around or you'd snap your neck. You must physically turn your torso around to completely see what is behind you.
Also, you can't really turn your elbow too far, or you risk pulling the humerus out of alignment with the ulna and radius.
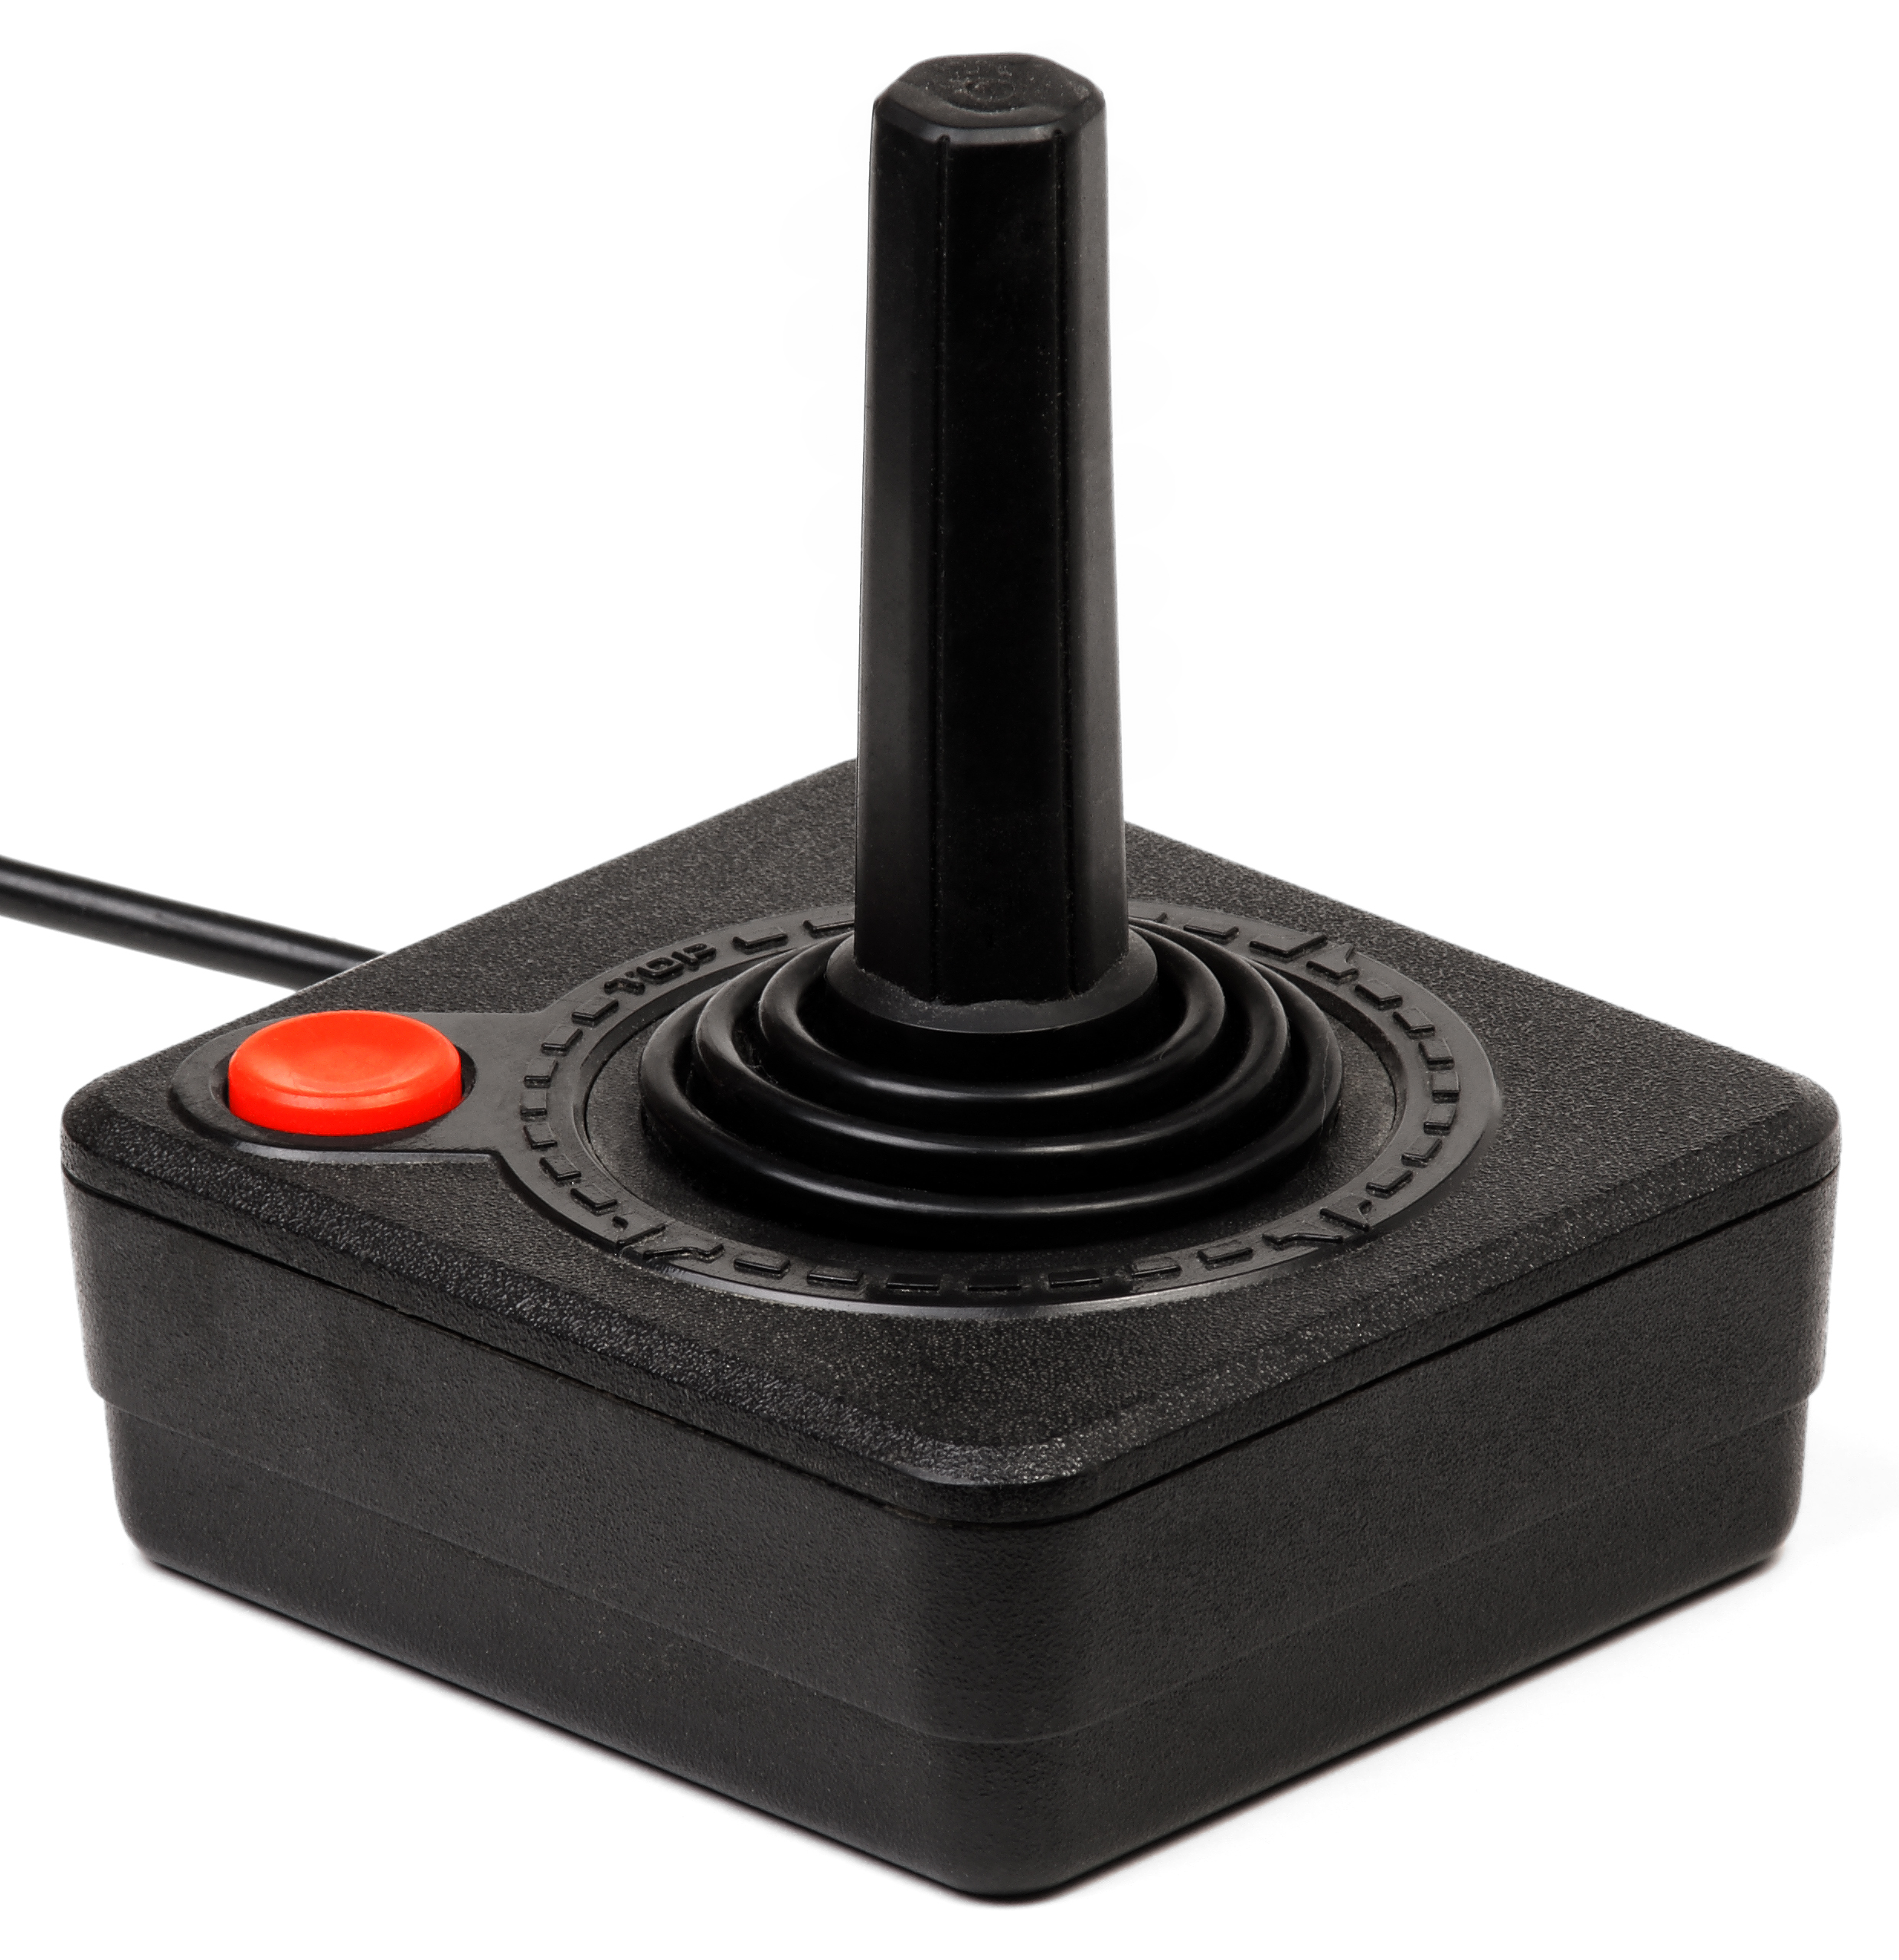
And so we come to the condyloid joints (ellipsoidal).
Think of this joint as something similar to an atari joystick.
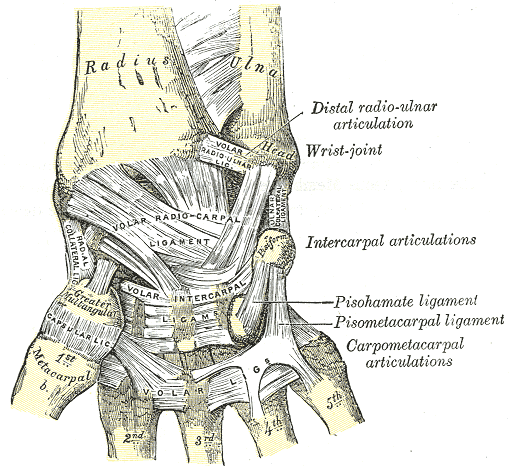
It can move around in all directions, but it cannot rotate, and has very limited circumduction due to the ligaments and muscles that bind it together. This type of joint is used for the wrist, your fingers, toes, and the Atlanto-occipital joint in your skull.
Fun fact: You may think you're rotating your wrist, but you really aren't. Actually grab hold of your forearm tightly and you'll suddenly find yourself unable to move your wrist in any sort of rotational manner.
Your fingers essentially function as many small joysticks since they have free movement as well (and some limited rotation if you physically force them to turn). The same applies to your toes.
As for the joint in the skull, that one is actually used for flexion and reflexion and the occasional laterotation. Essentially, it's what lets you move your head up, down, and around without needing to turn it.
Next is the Saddle Joint.
It allows for all free movement, including the limited circumduction.
You can only really find the saddle joint in the Carpometacarpal joint of your thumb.
This joint is unique in that it offers more options for free movement than the other finger joints, being that it is the one Carpometacarpal joint we can control movement wise. It's this freedom that gives our thumb such usability to clench into our fists and claw at objects.
If the thumb were like the other fingers, it would just have a limited clawing movement that your other fingers have.
Finally comes the last set of joints. The Plane (or Gliding) Joints
These joints only allow a gliding movement, but I'm not entirely sure if I grasp the concept.
You can normally find these joints on your ankles, wrists, and elbows.
And for your own sake everybody, here's a video detailing most of what I covered here.
-----------------------------
And there you have it, that's most of my research regarding joints so far. I may actually make an anatomy animation test soon to see how well I understand how these joints work.
I've already mapped the idea in my head. It shall be a boxer, or a wrestler doing a few punches, so look forward to that, ciao.
So here I am, trying my best to implement the things I've studied into words. As I try to jot down these notes, I do my best to take them to heart. But one cannot take anything to heart if it is not made with interest. With that in mind, I have decided to put my notes together about once a week about the things I've studied on my own time, so that I may take them to heart much better.
For this first analysis, I wish to bring up the Parallax effect.
The parallax effect is a term in animation that refers to how different objects move at different speeds, depending on their place in front of a moving camera.
To bring up an example, say you were riding on a train and you happened to look out a window. You should be able to notice that objects that are closer to the window seem to be speeding by at ridiculous speeds, while objects in the distance move at almost a snail's pace. Huzah, that is a parallax.
This also occurs when you are walking forwards. Though you won't really notice; objects that are closest to you will begin to leave your field of vision in such a way that it seems like they are sliding to the side. At the same time, they will blur as they leave your field of vision, until they have fully evaporated from your sight.
However, Parallax is not the same as zooming.
This is zooming:
When you are zooming in on an object you are merely just getting a closer look at an object that is far from your vision without really getting the detail of being in front of that object. Parallax on the other hand is the effect of actually getting closer to an object, thus forth, objects in the far, far distance will not suddenly come closer to you at the rapid speed as if you were zooming, but will gradually come closer at a snails pace, despite objects in the foreground coming closer at an even faster rate.
Many years ago, this effect was achieved by using a large camera called the multiplane camera, which would capture multiple images on glass planes. Then attendants would move the planes up, down or sideways with different timing, and then a shot would be taken for each one.
Here's a great video of Walt Disney explaining the camera (in a somewhat, exaggerated fashion).
Saturday, February 9, 2013
This is my newest animation finished today.
Behold, my first animation made entirely in Adobe After Effects. This piece represents a lot of hurdles and accomplishments from me in the perspective department, and in special effects. And shout outs to Josh for his stellar sound design. If you're an animator who has no knowledge of how to make something sound good, I suggest passing him an email, at: Jdyoung10@gmail.com
So why don't I start from the beginning, I made this video to be the introduction to a set of walkthroughs on youtube, hosted by Zelda Dungeon. [link] It is a walkthrough of a popular Zelda mod called, the Lost Isle. A very dark and depressing take on a Zelda adventure, being the equivalent to an entire Zelda game set in the Ikana kingdom. If you're interested, give the mod a run through, it is very enjoyable. [link]
So, getting back to the animation. I asked the webmaster of Zelda dungeon if he could allow me to do an intro animation for him, and he gave me the greenlight almost two weeks ago. Now I just have to give him this final file and we'll see what happens from there. Even if he changes his mind, I still am glad I made this.
Almost immediately from the get go I had an idea in my mind for what I wanted out of this animation. I wanted a piece that focused more on a quiet and eerie environment to match the tone of the game. At the same time, I had wanted something that was a little more dynamic and less flat than the standard animation I make. So I go the idea into my head to make this piece a parallax animation,( or a multiplane animation), to give the piece its more realistic depth. However, in my original storyboards for this piece I had planned for this place to be set on a beach. However, the idea I planned for those storyboards were far too ambitious for someone with my skill level, so I decided to change the location to a forest, to make things simpler for myself.
So after I got the idea in place, I began to plan out my animation for use in Flash, but that did not end well. I was very unsure on how to accomplish such an animated feat in a program like Flash, especially since I was not very adept at using any of the more complicated features of the program. This led me to being in a rut for about a day, until my animation teacher had given me the advice to use Adobe After Effects instead, and boy did that advice work miracles.
I immediately went to work in researching the parallax technique and how it affected the environment. I took multiple notes in attempts to have the technique stick in my mind. I then proceeded to work on animatics for the piece. I designed each layer in photoshop, and arranged them together to make the composition I was aiming for.
Also, at the same time, I had designed a logo for the video, and an idea for how the logo would be presented. I wanted it to be stylish but subtle, engaging enough to contrast with the bleak environments, but subtle enough to not be jarring. So I went with the lens flare, creating the title effect. It was a simple idea, but effective. Actually, scratch that, the Lens Flare certainly wasn't simple, especially not for someone like me. Because I didn't want to buy any plug ins for After Effects, I had decided to use the default one, and boy did that thing look ugly! Thanks to the help of a crafty tutorial, I was able to transform the default Lens Flare into that thing you see in the video there. It's not perfect, but it gets the job done well.
The fire effect was also planned from the animatic stages. I had desired for there to be a sort of background gimmick to the title for this game, much like the other games in the series, and since this game revolves so much around the quiet of the undead, I went for an ethereal greenish flame. I then use a Turbulence effect to get the fire to move realistically for the piece; After Effects pretty much did all the work.
It took multiple experiments with After Effects, but eventually I had gotten everything pretty much correct. I got the timing, the speed, and the logo all pretty much worked out. It was time to move on to the final animation.
I quickly drew up another environment in Photoshop and pasted it into After Effects. From there is was a simple game of replicate the animatic, the only major difference is that I had made was the color scheme, and the fog effect.
I am not particularly good with colors and color theory, so I had a difficult time wrapping my head around the scheme for a dark scene. I eventually went with this dark blue to try and capture the feeling of darkness. And I guess it looks nice enough.
The fog also came next. the final piece was still coming along a little too unrealistic for me to buy as a whole, so I decided to add one more special effect to set the mood of the rest of the piece. The fog was simple enough to implement, and really sets the mood just right in my opinion.
After that, the animation was pretty much done, and I had to get some sound design done. However, I am not a sound designer, and my sound effects were sounding like crap anyways. It was at that point I went on to enlist Joshua's help, and I must say that he did a stellar job in just capturing the mood and feeling of the entire piece. I really implore all you aspiring animators watching this, if you can't make sound for crap, then look no further than Josh, he's got you covered.
----
Looking back at this piece now, I do wish I had gone with a graveyard motif to match the setting of the game, but that ship has long sailed off, and this is what I have now. Oh well, I think it looks nice for an early attempt at making good animation.
And that's all I pretty much have to say about this. I hope you enjoy this video as much as I enjoyed making this animation.
Hello, the name is Davis, an up and coming student animator in the field. I'm attempting my best to create work that is as fantastic in every way I can possibly make it. At the moment I am in the middle of brushing up on my anatomy and animation skills, here is a compilation of some of the animation I've made so far.
It is not too much, but I've only recently started to get truly seriously with my animated works.


.jpg)


